
Hyderabadi Dum Biryani is a popular one in Mughlai cusine. Actually it is popular for the non veg versio. I wanted to try the Hyderabadi Veg Dum biryani for quite a while but i somehow keep on postponing it. During our December trip to Chennai, happened to eat the Veg dum biryani at Cream center chennai and i got hooked with the taste of it. From then the urge to try it was more. Last weekend when my sister, told me that she tried Dum biryani for Sunday lunch and later shared with me the pictures too. I immediately decided to give it a try and tried it on the Republic day as kids were around on that day. I must say it is a bit lengthly procedure compared to the Pressure cooker biryani, but it is worth trying. Generally i am a kind of person who never gets satisfied with my work, though everyone at home says it was awesome !!. Very rarely i pat myself, wow you did a good job. This Hyderabadi Dum biryani is one among the "wow", that i was telling appreciating myself a lot. Do try this at home this weekend and let me know the feedback. Follow Jeyashri's Kitchen on facebook and on Instagram too.
Check out my other biryani too
Hyderabadi Dum Biryani
Preparation Time : 20 mins | Cooking Time : 45 Mins |Serves: 3Basmati rice 1 cup
Mixed veggies 1/2 cup*
Whole spices few**
Red chili powder 1 tsp
Mint leaves a handful
Garlic pods 5
Green chili 1
Kalpaasi few
Ginger a small piece
Fennel seeds| sombu 1 tsp
Oil 3 tblsp
Ghee 2 tsp
Tomato 1
Salt as needed
Saffron a pinch
Milk 1 tblsp
Yogurt 1 tblsp
Onion 3
Biryani Masala 1/2 tsp (use any store bought masala)
*I used carrot, beans and green peas.
** I used mace, 2 cloves, cardamom 1, star anise1 and bay leaf

Method:
- Soak the rice in 2 and 1/2 cups for 20 minutes.
- In a pan add the rice along with the whole spices and little salt and few drops of oil.
- Once the rice is 3/4th cooked, drain the water and discard the whole spices.

- Cut the onions into thin long slices. Add 2 tblsp of oil in a non stick pan and start cooking the onions till it becomes golden brown. Traditionally it will be deep fried. But i didn't do that.

- Keep it aside.
- Grind the garlic, ginger, mint leaves, green chili, kalpaasi (stone flower) and fennel seeds into a fine paste. If needed add 1-2 tsp of water.

- Soak the saffron in warm milk . Boil the veggies in 1 cup of water or you can microwave it for minutes till soft. Let it be crunchy not too soft.
- Do not add too much water and end up in discarding the water. Add little by little and cook the veggies.

- In a pan add 1 tblsp oil and ghee and add the ground green paste to it.
- Saute it for a while till the raw smell goes.
- Add the yogurt to this and mix well.

- Cook for a minute and add the tomato puree. You can grind the tomato and add. I added the store bough puree as my tomatoes were pale.
- Add the red chili powder to this. Choose the one which gives nice colour.

- Add the par boiled veggies to this. Add salt and biryani masala to this. Remember we have added the salt in the rice too.
- Cook for 2 minutes.
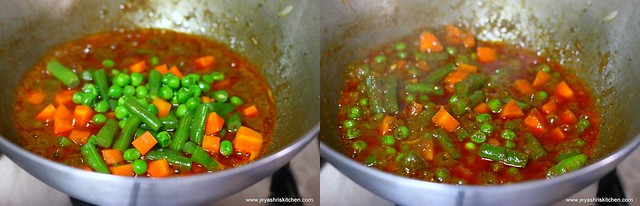
- Switch off the flame. Now this mixture will be slightly in saucy consistency. Now let's start layering the biryani.
- Take a heavy bottomed vessel. I used my non stick pan as the base was thick for that.
- Layer first with fried onions. Spread one portion of the cooked rice on this by covering the onions fully.

- Add half portion of the saffron milk to this by sprinkling it all over the rice.
- Add the saucy vegetable mix to this. Spread this as a layer.
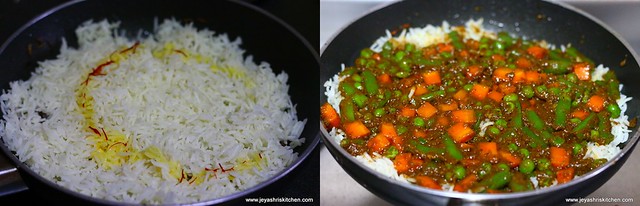
- Spread the remaining rice over this and cover it fully. Sprinkle the remaining saffron milk to this.
- Now cover the pan with a aluminum foil. Alternatively you can cover it with thickly rolled chapathi dough.
- Heat a dosa pan and when it hot, place this covered pan onto this. Keep the flame low and let this be on this tawa for 10 minutes.

- Open the foil after 10 minutes and carefully fluff it up with fork and mix well.
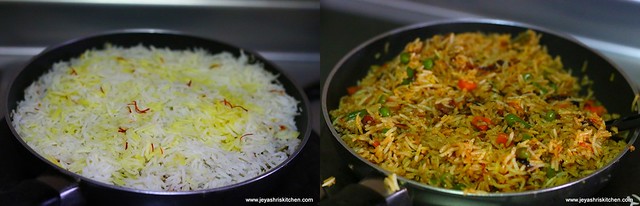
- Super hot Veg Dum biryani is ready to serve. Serve with onion raitha and the popular Hyderabadi Mirchi ka salan.

Notes:
- Always cook the rice in separate grains.
- You can add the whole spices either in the rice or in the oil before adding the ground green paste.
- I do not like the whole spices to come in between while eating, so i discarded it after putting it in the rice.
- Since yogurt and saffron milk is there do not alter the quantity of red chili powder. The biryani was medium spicy.
- If you are making in bulk, divide the portions and layer it one more time.
- Fried onions contributes a major part in enhancing the taste. So do not compromise on it.
Wow... Somehow, I became a fan of this Dum Biriyani. As always, your clicks are awesome.
ReplyDeletelooks so yummy
ReplyDeleteSimple,clear steps.. Jeyshri.. thank you..
ReplyDeleteUsha, Jeeyapuram
Biriyani looks very appetizing..
ReplyDeletesuper yummy biryani
ReplyDeleteYum! Love your clicks ! Thanks for sharing!
ReplyDeletetempting pic , nice recipe but lengthy process
ReplyDeleteHave heard so much abt this Biriyani. Gonna try.. Great pics and superb explanation :)
ReplyDeleteCame out very well ,tried hyderabadi biryani for the first time tasted like restaurant biryani thanks mam all your recipes are too good and professional would like to have some cake recipes with egg
ReplyDelete