Monday, January 28, 2013

PANEER KOLHAPURI | PANEER RECIPES | SIDE DISH FOR ROTI

Paneer Kolhapuri is an interesting  Paneer side dish and also different from the usual Paneer Butter Masala and other paneer recipes. Recently i came across the name of the recipe through a friend and i just searched about the recipe in google and finally ended up in making my own to suit my family’s taste.
We had this with Jeera rice and simple Yellow dal.
Paneer Kolhapuri 3
INGREDIENTS:  (Serves 3-4 )
PANEER CUBES 1 CUP
ONION 1
TOMATO 2 ( I USED 1/4 CUP TOMATO PUREE)
GINGER GARLIC PASTE 1/2 TSP
CUMIN SEEDS 1/4 TSP
DRY COCONUT(KOPARAI) 4 TSP
WHOLE BLACK PEPPER 5-6
SAUNF ( SOMBU) 1/2 TSP
SESAME SEEDS 1 TSP
CARDAMOM 1
CLOVES 2
CASHEW NUTS 4-6
RED CHILLI POWDER 1/2 TSP
CORIANDER POWDER 1/2 TSP
OIL 1 TBLSP
CORIANDER LEAVES FEW
Paneer Kolhapuri 2
METHOD:
  • Dry roast the black pepper, dry coconut, sesame seeds,cardamom , saunf, and cloves till the coconut turns nice brown color. Take care not to burn it.  Lastly add the cashew nuts and switch of the flame. Grin this into a fine paste adding little water.
paneer step 1 paneer step 2
  • In a pan, add oil and add the cumin seeds and  ginger garlic paste.
  • Saute in a low flame till the raw smell goes. Chop the onions finely and add to this.
  • Saute till the onions turn brown.
paneer step 3 paneer step 4
  • Now add the ground masala. After few seconds add the tomato puree( if adding tomatoes, grind it nicely and add at this stage) , red chilli powder, coriander powder and salt.
paneer step 5 paneer step 6
     Let this cook for a while in a low flame . Add the paneer cubes and add water to reach a desired consistency. Check for salt. If you wish you can add a dash of garam masala. Garnish with coriander leaves.
Paneer Kolhapuri step 7
  •   Serve hot with roti | jeera rice. Will be posting the recipe of jeera rice soon.
Paneer Kolhapuri 1
Note:
  • Paneer can be replaced with mixed veggies like carrot, peas and cauliflower.
  • You can add 1/2 tsp of poppy seeds( Khas khas) if you want while grinding the masala.


Friday, January 25, 2013

CAULIFLOWER PEPPER FRY | CAULIFLOWER RECIPES

Cauliflower is one among my favorite veggies and i love to have this with simple rasam and rice and even as a side dish for chapathis too. Being bored with the usual Cauliflower Curry i was thinking to make some different with cauliflower and tried out cauliflower curry using freshly ground pepper. It turned amazing well and especially kids enjoyed this a lot. Go ahead and try out this cauliflower pepper fry  recipe.
Cauliflower pepper fry 2
INGREDIENTS: ( Serves 3)
CAULIFLOWER 1 (MEDIUM SIZE)
ONION 1
GINGER GARLIC PASTE 1 /2 TSP
BLACK PEPPER 3/4 TSP
CUMIN SEEDS 1/2 TSP
SALT TO TASTE
TURMERIC POWDER A PINCH
OIL 1 TBLSP
Cauliflower pepper fry 3
METHOD:
  • Wash the cauliflower and cut them into small florets.
  • Chop the onions into thin slices. In a pan add oil and add ginger garlic paste.
  • Saute for a while and add the onions and saute till they become translucent.
CAULIFLOWER 1 CAULIFLOWER 2
  • Add the cauliflower florets to this. Using a mortar and pestle, coarsely ground the black pepper and cumin seeds separately.
CAULIFLOWER 3 CAULIFLOWER 5
  • Add this to the cauliflower and add salt and turmeric powder.
CAULIFLOWER 6 CAULIFLOWER 4
  • Sprinkle little water and cook the florets become soft.
  • Switch off the flame once it is done.
CAULIFLOWER 7     
  • Serve hot with rasam rice or sambar rice. Even this will taste yum with Phulkas.
Cauliflower pepper fry 1 
Note:
  1. Do not add any curry leaves or coriander leaves as this will supress the pepper flavor.
  2. You can use store bought pepper powder and cumin powder but freshly ground one is highly recommended.


Wednesday, January 23, 2013

HOT AND SOUR SOUP | HOT AND SOUR VEG SOUP RECIPE

Hot and sour soup is one my most favourite soup,  but i never attempted to do it at home , as i feel certain dishes will taste super yum in restaurants. During our trip to India in December, i bought a Knorr Hot and sour veg soup  packet and made it after coming to Singapore. We all enjoyed it but hubby was insisting me to try it at home. So i searched for the recipe in google and finally made my own of making Hot and Sour vegetable soup.
Thank you Nags for introducing me to the Chinese celery , else i would have ended up buying the bigger one with thick stems.
hot and sour soup 1
INGREDIENTS:
CARROT 1/4 PORTION
CABBAGE(FINELY CHOPPED) 4-5 TBLSP
SPRING ONIONS FEW
CELERY FEW
GREEN CHILLI 2
SUGAR 1/2 TSP
SALT AS NEEDED
LEMON JUICE 1 TSP
GARLIC 4-5 CLOVES
CAPSICUM 3-4 TBLSP
SOYA SAUCE 1 TBLSP
OIL 1 TSP
CORN FLOUR 1 TBLSP
PEPPER POWDER TO TASTE
Hot and sour soup 2
METHOD:
  • Chop the celery, spring onion, carrots, capsicum, cabbage finely. Separately chop the spring onion  bulb and leaves .
  • In a deep wide pan, add oil (preferably olive oil) and add the slit green chilli.  When it changes the color, take it out and discard the chilli. We need just the flavor of the chilli to get into the oil.
hot and sour soup step 1 step 2 hot &sour
  • Add the finely chopped garlic and sugar and saute for a while.
  • Now add the veggies which we chopped finely, except the spring onion leaves.
step 3 hot & sour Step 4 hot & sour
  • Saute for a minute and add 3 cups of water. You can add VEGETABLE STOCK too instead of water. Click on the link to see the recipe of stock.
  •  Add salt and bring it to a nice boil.
  • After 5 minutes mix corn flour in 2 tblsp of water without any lumps and add it to the pan.
  • Mix well. The soup will reach the right consistency in 2 minutes. Add soya sauce and put off the flame.
Hot & sour step 5 Hot & sour step 6
  • Add pepper powder and lemon juice.
  • Garnish with spring onion leaves and chopped carrots.
hot and sour soup 3
NOTE:
  1. Always add the veggies finely chopped.
  2. U can add extra 1 tblsp of soya sauce if you want the darker color. But don’t add too much it will spoil the taste.
     

Monday, January 21, 2013

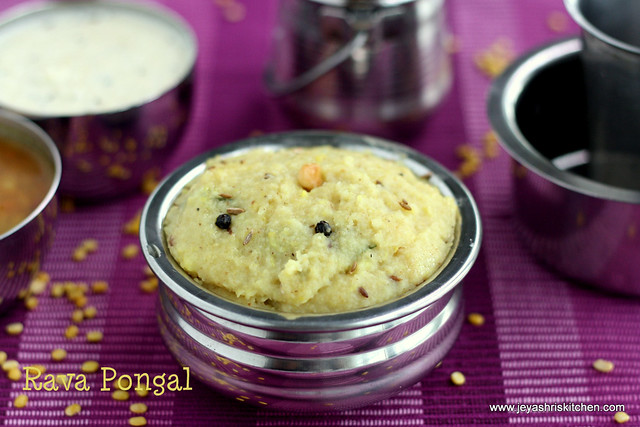
RAVA PONGAL | RAVA PONGAL RECIPE

SOOJI PONGAL

Rava- Pongal
Rava Pongal- A healthy breakfast or dinner recipe of pongal made using yellow
moong dal and rava (semolina or sooji). Few years back, I tried making Rava
Pongal, when I wanted to make something different for breakfast at my in law's
place. I remembered a friend mentioning about this dish to me. After this incident, I
completely forgot about this dish. It did not strike me in those days that we could
recipes of different dishes from the internet. Yesterday, when I suddenly
remembered Rava Pongal, I tried making it the second time using my own discretion
with the recipe. I must say, we were quite happy the results, in terms of the texture
and taste of the pongal. Hence, I decided to document this recipe.
Also check out my Collection of South Indian breakfast recipes

Thursday, January 17, 2013

GARLIC PICKLE RECIPE | EASY PICKLE RECIPES

Though i love the addition of garlic in pickle i have never tasted garlic pickle. But my sister who is good at making this garlic pickle was insisting me to try this garlic pickle and wanted me to post in my blog for a long time. Somehow i couldn’t make it , but when i got a reader request for this recipe, i asked my sister during my visit to India in December and immediately noted down it and made it after coming back to Singapore. It tasted very well and we all loved it so lets see how to make instant garlic pickle.
Garlic Pickle 4
INGREDIENTS:
GARLIC 2 BULBS
SESAME OIL 2 TBLSP
METHI SEEDS(VENDAYAM) 3/4 TSP
REDCHILLI 5-8
CUMIN SEEDS 3/4 TSP
TAMARIND EXTRACT 1/4 CUP
JAGGERY 1/2 TSP
SALT AS NEEDED
Garlic pickle 2
METHOD:
  • Dry roast the red chilli, cumin seeds, methi seeds and add salt in the last.
  • When it cool and grind into a fine powder.
garlic pickle step 2 garlic pickle step 5
  • Take out the skin of garlic. Add oil in a pan and add the garlic pearls to the oil and saute in a low flame till it turns golden brown.
garlic pickle step 3 garlic pickle step 7
  • Now add the ground spice mix and saute for 2 minutes and add the tamarind water and jaggery. 
  • Mix well and saute for 2 mins and switch off the flame. you can add a tsp of sesame oil if you want.
garlic pickle step 8 garlic picklestep 9
  • Transfer it to a dry container. Enjoy with curd rice and even with sambar rice too.
Garlic pickle 3         
Note:
  1. This yielded 1/2 cup of garlic pickle.
  2. Always use dry spoon to take out the pickle.
       

Monday, January 14, 2013

LEMON RICE | LEMON RICE RECIPE

IMG_2786
Lemon rice is a simple recipe which i rarely make make at home but will  be very handy for lunch box on weekday mornings when i get up little late and running out of time. We make this for Kannum pongal and Aadi 18 too along with other rice varieties. Here is my version of Lemon rice.
Lemon rice 3
INGREDIENTS:
COOKED RICE(RAW RICE) 1/2 CUP
LEMON JUICE 1 TBLSP
GREEN CHILLI 2
GINGER(grated) 1/2 TBLSP
SALT AS NEEDED
OIL 3/4 TBLSP
MUSTARD SEEDS 1/4 TSP
CHANNA DAL 1 TSP
URAD DAL 1 TSP
PEANUTS 1 TBLSP
CASHEWNUTS 1 TSP(OPTIONAL)
ROASTED GRAM 1/2 TBLSP
TURMERIC POWDER 1/4 TSP
CURRY LEAVES FEW
SALT AS NEEDED
IMG_2772
METHOD:
  • Cook the rice into separate grains and allow it to cool completely by spreading it in a wide plate.Add salt to this. In a pan, add chopped green chilli,ginger, urad dal, channa dal ,roasted gram and cashew nuts. Keep it in a low flame and let the dals get golden brown color.
IMG_2749 IMG_2751
  • Add the mustard seeds now and when it crackles add the turmeric powder. Switch off the flame and add it to rice.
IMG_2753 IMG_2754
  • Add lemon juice and mix well. check for salt. Serve with papad, vadam or with Mor kuzhambhu as my mom does.
  • IMG_2758
 IMG_2761      
NOTE:
  1. I used sona masoori rice, you can even use basmathi rice.
  2. The quantity of lemon juice depends on the tanginess of the juice and according to your taste buds too.
  3. You can add grated carrots in the last to make it healthier.
IMG_2749 IMG_2751 IMG_2753 IMG_2754 IMG_2757 IMG_2758