Friday, November 8, 2013

CAULIFLOWER SOUP RECIPE|SOUP RECIPES

Soups are always liked by all at home. Especially during rainy season i make soups very often and almost every week especially after the kids come back from swimming class, they prefer to have warm soup. As i am  going for a short visit to India tomorrow i was cleaning my refrigerator and i have half pack of cauliflower florets and i thought i will make soup with the cauliflower. I just made it as i usually do all other soups. It turned out so very well and we all enjoyed it during our dinner time. the cauliflower soup was quite filling too.
cauliflower-soup
PREPARATION TIME: 10 MINUTES . COOKING TIME: 20 MINUTES. SERVES :3-4
INGREDIENTS:
CAULIFLOWER FLORETS 1 AND1/2 CUP
ONION 1
GARLIC 3-4
WATER| VEGETABLE STOCK 1 CUP
LOW FAT MILK 1 CUP
SALT AS NEEDED
PEPPER | OREGANO AS NEEDED
GINGER A SMALL PIECE
OLIVE OIL | BUTTER 1 TSP
Cauliflower -Soup
METHOD:
  • Wash the cauliflower florets and chop the onions and garlic roughly.
  • In a pan add olive oil | butter and saute the onions and garlic for a few minutes.
  • Add in the cauliflower florets and saute for 2-3 minutes.
ginger onion cauliflower
  • Add 1 cup of water | vegetable stock . Vegetable stock gives a nice flavour to the soup, so don’t miss it. Add ginger and cook till the cauliflower becomes soft.
  • Once done discard the ginger. Allow the cooked cauliflower to become cool and add grind this into a fine puree.
dis card ginger soup recipe
  • Now add the low fat milk and let this boil for 5 – 7 minutes.
  • switch off the flame and add salt and pepper just before serving.
soup soup
  • You can add oregano and red chilli flakes to this soup instead of adding pepper.
Check out my other interesting soups too
    1. Carrot and Peas Soup
    2. Italian bread soup recipe
    3. Carrot and Ginger Soup
    4. Hot and Sour veg Soup
cauliflower- soup        

Wednesday, November 6, 2013

ARACHUVITTA VATHAL KUZHAMBU | VATHA KUZHAMBU RECIPES

Vathal kulambhu | vathakuzhambhu is an easy dish which we normally make at home almost once or twice a week. I have already few collections of kuzhambhu varieties here. This arachuvitta vatha kuzhambhu is a must try one with freshly ground spices and tasted exactly like the one served in weddings as an accompaniment for CURD RICE. I got this recipe from my friend’s mil who gave the recipe of Kalyana rasam . Special thanks to you Kalyani mami for giving me such nice recipes.

arachuvitta- vathakuzhambhu

Coming to the recipe of arachuvitta Vathal kuzhambhu. Generally manathakkali vathal or sundakkai vathal(turkey berry) is used for this. I used manathakkali vathal.

Preparation time: 10 minutes Cooking time:25 minutes . Serves: 6-7

INGREDIENTS:

MANATHAKKALI VATHAL 2 TBLSP
TAMARIND A SMALL LEMON SIZED
SAMBAR POWDER 2 AND1/2 TSP
JAGGERY 1 TSP
CORIANDER SEEDS 1 TSP
CHANNA DAL 1 TSP
RED CHILLI 2
COCONUT(GRATED) 2 TSP
TURMERIC POWDER 1/4 TSP
SALT AS NEEDED
MUSTARD SEEDS 1/2 TSP
ASAFOETIDA 1/4 TSP
SESAME OIL 2 TBLSP
CURRY LEAVES FEW

vatal-kuzhambhu

METHOD:

  • Roast the dhaniya , chana dal and red chilli till golden brown.
  • Grind this into a fine paste by adding little water along water along with coconut.
    IMG_5002 IMG_5003
  • Soak the tamarind in hot water and extract 3 cups of tamarind juice.
  • In a pan add 1 tblsp of sesame oil and add the mustard seeds, curry leaves and the manathakkali vathal.
  • Saute till the mustard splutter.
  • Add in the tamarind juice.
IMG_4998 IMG_4999
  • Add the turmeric powder, sambar powder, asafoetida, jaggery, and salt. Mix well. Let this boil for 5-7 minutes.
  • Add the ground paste and keep the flame to low.
  • Let this boil for 10 more minutes.
IMG_5001 IMG_5004
  • This will become semi thick gravy. Put off the flame and add the remaining 1 tblsp of sesame oil and some curry leaves too.
IMG_5005 IMG_5006
  • Delicious vathakuzhambhu is ready to serve.
  • My daughter loves to have vathakuzhambhu with Simple potato fry.

Arachuvitta - vatha-kuzhambhu

Note:

  • If the vathal you use has salt in it then do not add salt to the kulambhu as it will be more.

Monday, November 4, 2013

CURRY LEAVES POWDER |KARUVEPILLAI PODI RECIPE |PATHIYA SAMAYAL

I wanted to blog about this karuvepillai powder | curry leaves powder recipe for a long time but some how was busy during this diwali time and now after all the oily food, i wanted to settle down with some normal soothing food for the tummy and this so i thought of posting this curry leaves powder. This can be made and stored in  an airtight container and this helps in preventing hair loss and early greying of hair. Even this is given for newly delivered mothers as the urad dal in this powder will strengthen the pelvis and the curry leaves as such gives a medicinal effect and will be best for lactating mothers.
Karuvepillai-podi
Curry leaves powder when mixed rice smeared with ghee or sesame oil will taste awesome . a simple roasted papad will be a great accompaniment to this.
Check out my KARUVEPILLAI KUZHAMBHU, KARUVEPILLAI THOKKU too.
PREPARATION TIME: 5 MINUTES . COOKING TIME: 10 MINUTES. MAKES : 3/4 CUP
INGREDIENTS:
CURRY LEAVES |KARUVEPILLAI 1 CUP (Tightly packed)
URAD DAL 1/4 CUP
RED CHILI 7-8
TAMARIND A SMALL LEMON SIZED
SALT AS NEEDED
ASAFOETIDA 1/4 TSP
OIL 1/2 TSP
curry-leaves-powder
METHOD:
  • Wash the curry leaves and pat dry them using a kitchen towel.
  • Spread this for some time.
  • In a pan add the urad dal and red chilli till golden brown and keep it aside.
  • In the same pan add oil and add the tamarind and asafoetida saute for 2-3 minutes in a low flame.
dal and redchilli tamarind
  • Keep it aside. Now add the curry leaves and saute for a minute. The curry leaves will slightly shrink. Add salt to this and switch off the flame.
curry leaves curry leaves
  • when cool, grind this into a fine powder in a mixer. ensure that the mixie is dry.
  • If you want to add garlic you can crush 1 or 2 garlic and roast this while roasting dals and grind it along.
podi
  • If you want this a coarse powder, grind the dal into fine powder and lastly add the curry leaves and just pulse it once or twice.
  • I remember my mother in law adding half portion of urad dal and half portion of channa dal to this.
  • Store this in an airtight container and always handle this with a  clean ,dry spoon.
  • This can be kept in room temperature for 15 days. curryleaves powder

Saturday, November 2, 2013

DIWALI WISHES 2013

Wish all my readers a very Happy and safe Diwali. May this Festival of Joy brings you abundance of joy, wealth and health. Wishing you most and more. See you all next week with more interesting recipes. Thank you so much for trying out the recipes from here.

Happy diwali

Thursday, October 31, 2013

CORNFLAKES MIXTURE |EASY DIWALI SNACKS RECIPES| LOW FAT SNACK


Cornflakes mixture is a healthy one and not a deep fried one too. If you want the recipe of Traditional South Indian mixture please click Here. This corn flakes mixture is not deep fried and if you want to have a healthy snack, you can try this out for diwali. If you have a diabetic elders at home surprise them with this cornflakes mixture this diwali. Apart from diwali snack you can make this as a tea time snack too. This  cornflakes mixture can be made in 10 minutes. Check out my Poha | aval mixture
cornflakes-mixture
PREPARATION TIME: 5 MINUTES .COOKING TIME: 10 MINUTES .YIELDS: 1 CUP
INGREDIENTS:
CORNFLAKES* 1/2 CUP
PEANUTS 1/4 CUP
ROASTED GRAM|POTTUKADALAI 1/4 CUP
MUSTARD SEEDS 1/4 TSP
CURRY LEAVES FEW
RED CHILLI POWDER 3/4 TSP
CHAAT MASALA 1/4 TSP(OPTIONAL)
SALT AS NEEDED
SUGAR 1/4 TSP
OIL 1 TSP
Corn-flakes mixture
METHOD:
  • In a pan add oil and throw in the mustard seeds, and curry leaves.
  • Let the curry leaves become crunchy. roast in a low  flame. Add in the roasted gram, Saute till it becomes golden brown.
mixture mixture
  • I added store bought roasted peanuts. If adding raw peanuts, saute for few minutes.
  • After roasting peanuts add the red chilli powder, salt, chaat masala and sugar. Saute for a minute and add in the corn flakes.
  • Let this roast in low flame for 5 minutes.
cornflakes mixture corn flakes mixture
  • Corn flakes mixture is ready.
  • Store this in an airtight container. This will stay crispy for a week.
  • *I used Kellogg's cornflakes.
Cornflakes-mixture     

Wednesday, October 30, 2013

ALOO BHUJIA RECIPE | EASY DIWALI SNACKS RECIPES

Aloo bhujia is an easy and quick snack which you can try it at home for this Diwali. For a change to the usual omapodi we make this Aloo bhujia is definitely a hit among your family for sure. Without much write up let me move on the recipe of Aloo bhujia.

Alu-bhujia

PREPATION TIME:30 MINUTES . COOKING TIME: 30 MINUTES .MAKES: 2 CUPS

INGREDIENTS:

POTATO | ALOO 2
BESAN |KADALAI MAAVU 1 CUP
GARAM MASALA 1/2 TSP
LEMON JUICE 1 TSP
RED CHILLI POWDER 1 TSP
SALT AS NEEDED
OIL FOR DEEP FRYING

Bhujia-Sev

METHOD:

  • Boil the potatoes or pressure cook till it becomes soft.
  • When cool peel the skin and very nicely mash it without any lumps.
  • In a wide bowl, add besan, red chilli powder, garam masala, salt and lemon juice. I grated the potato but it got struck while pressing in oil. so nicely mash it without lumps.
  • Mix it well. Sprinkle little water and knead this into a pliable dough. do not worry if it is sticky.
Aloo-bhujia aloo-bhujia
  • Using the Omapodi | Sev achu put the dough inside the murukku presser, and start squeezing in hot oil.
  • This gets cooked very fast, so take it out as soon as it is done. the sizzle sound will subside once it is cooked.
  • Be careful not to get it too brown.
Aloo- bhujia Aloo bhujia
  • Repeat the same process for the rest of the dough.       Aloo - Bhujia

NOTE:

  • Since potato gives a soft texture , no need to add oil or butter to the dough.
  • Adjust red chilli powder according to the taste.
  • Chaat masala can be added to the dough while making.


Tuesday, October 29, 2013

DRY FRUITS LADOO | EASY DIWALI SWEET RECIPES | DRY FRUITS AND NUTS LADDU

Dry fruits is one of the easiest sweet which can be done in 5 minutes and this recipe of dry fruits ladoo is made without sugar too. Interesting right!!. Yes the one of the easy sweet i made for this Diwali is Dry fruits laddu which i learnt from a friend who gave this for me during last diwali. If you are running out of time and even working ladies in the last minute if you want to make something very easy at home this dry fruits laddu is the perfect one. Even you can involve your kids in making this ladoos. Check out my Diwali collections recipes.
mixed nuts ladoo
Before going into the post, i wanted to share 2 sweet news
  1. Lokmat times a Pune based magazine in it Nashik edition has featured 2 of my recipes, Mothichoor ladoo and carrot burfi recipe Click the picture to see it.
lokmat times
  1. Nirlep India , popular brand of selling Non stick cook ware , featured my Kaju katli recipe . Please visit their facebook fanpage to see it by clicking the picture.
nirlep
Now coming to the recipe of Dry fruits ladoo:
PREPARATION TIME: 5 MINUTES . COOKING TIME: 3 MINUTES . MAKES 14 LADOOS
INGREDIENTS:
DATES (PITTED) 20
MIXED NUTS* 1/2 CUP
GHEE 1 TSP
dry-fruits-ladoo
METHOD:
  • Take out the seeds from the dates .
  • Dry roast the *nuts ( i used walnuts, cashew nuts, badam, pumpkin seeds, and pista) for 10 minutes in a low flame without getting burnt.
dates nuts
  • In a non stick pan, add ghee and add the dates and cook for 2 minutes . Do not get it burnt. The dates will get into a goey texture.
dates dates
  • Coarsely pulse the nuts in a mixer. Add this to the dates mixture. Switch off the flame.
ladoo dry fruits ladoo
  • Grease your hands with ghee and make ladoos of your desired size.
ladoo5
  • If you want you can roll it i desiccated coconut.
  • This will stay at room temperature for 2 days and keep it in the fridge for next few days. 
dry- fruits- ladoo       Stay tuned for more Diwali recipes!!
Have a look on my DIWALI RECIPES .

Monday, October 28, 2013

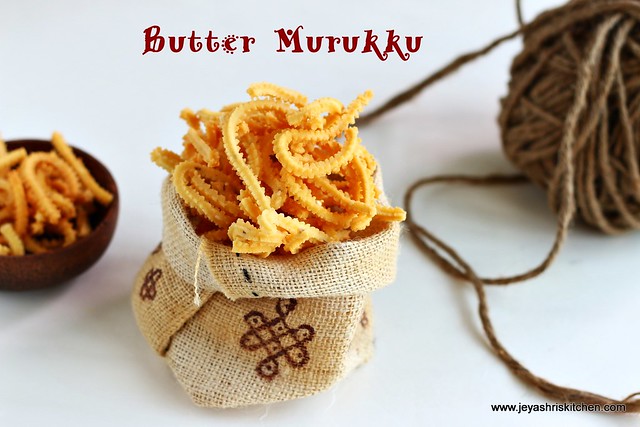
BUTTER MURUKKU| WITH VIDEO|EASY DIWALI SNACKS RECIPES

butter- murukku
Butter murukku is an easy diwali snack and gives a nice flavor of pottukadalai |roasted gram in the murukku. I learnt this recipe of butter murukku from my friend . If you are a beginner in making murukku you can try out this easy murukku as it you can squeeze into bits in oil and no need to shape the murukku. Try out this easy reciep of murukku for Diwali 2013. Stay tuned for more easy and interesting diwali recipes coming in the next few days. Check out my full collection of diwali recipes